
Pressed flowers allow us to keep a small piece of the season after the garden has changed.
A bloom gathered during a walk, clipped from your own garden, saved from a meaningful bouquet, or received from someone you love can become more than a temporary decoration. Once pressed, it can be framed, arranged, recorded, carried, displayed, or worked into something useful for the home.
In Why We Need Flowers: Beauty, Memory, Ritual, and Connection, we explored the deeper reasons flowers matter to us: the way they bring living presence into our homes, mark the seasons, hold memories, give form to feelings, and connect people, places, and generations. Pressing flowers offers one way to preserve a small part of those experiences and carry their meaning forward.
Part of the charm of pressed-flower crafts is that no two projects will ever be quite the same. The curve of a stem, the fading of a petal, and the small irregularities in each leaf become part of the finished piece. Even familiar flowers take on a new quality when flattened and viewed closely. Their structure becomes clearer, and details that once seemed hidden begin to stand out.
These projects range from simple arrangements that require little more than a frame to more involved ideas using candles, trays, paper, resin, journals, and decorative objects. Some preserve the flower itself, while others use pressed blooms as a starting point for memory, symbolism, design, and creative play.
Pressing is one of the simplest ways to preserve flowers, especially when you want to use them in framed art, cards, bookmarks, journals, and other flat projects. It does change the flower’s shape, however. If you would rather preserve a bloom in three dimensions, condition flexible foliage, or compare several approaches before choosing one, see my complete guide to flower-preservation methods.
Begin With Flowers That Press Well

Thin, naturally flat flowers tend to be the easiest to press and the quickest to dry.
Good options include:
- pansies and violas
- cosmos
- daisies
- forget-me-nots
- Queen Anne’s lace
- hydrangea florets
- small asters
- individual rose petals
- clover
- ferns
- small leaves
- delicate herbs
- grasses and seed heads
Thicker flowers can still be used, but they may need to be separated into individual petals or carefully trimmed before pressing. Large roses, peonies, dahlias, and similar blooms are often easier to preserve one layer at a time.
Choose flowers that are fresh but completely dry. Avoid pressing them immediately after rain or while morning dew remains on the petals, since extra moisture can lead to browning, mildew, or uneven drying.
Simple Ways to Press Flowers

Press Flowers in a Book
Place the flowers between two sheets of absorbent paper, then close them inside a heavy book. Add more books or another flat weight on top.
Check them after one to two weeks, although thicker materials may need longer. Replacing damp paper during the first few days can help flowers dry more cleanly.
Use a book you do not mind potentially staining, or place the flowers between several protective sheets before closing it.
Use a Traditional Flower Press
A wooden flower press allows air and pressure to be distributed more evenly. It is especially helpful when pressing several flowers at once or when you expect pressed-flower projects to become a regular seasonal practice.
They are also quite simple to make. My husband made mine very quickly using two flat pieces of wood with holes drilled near the corners, long bolts, washers, and wing nuts. Between the wooden boards, you can layer sheets of cardboard, absorbent paper, and flowers. Tightening the wing nuts presses everything together evenly, while the cardboard helps air move between the layers.
The exact size can be adjusted according to the materials you have and the kinds of flowers you expect to press. A small press is easy to carry on walks, while a larger one gives you more room for leaves, stems, and several specimens at once.
Try a Microwave Flower Press
Microwave presses can dry flowers much more quickly, but the timing varies according to the flower, moisture level, and press. Work in very short intervals and follow the instructions supplied with the press.
Purchase Flowers Already Pressed
There is nothing wrong with beginning with prepared pressed flowers, especially if the varieties you want are unavailable locally or you would rather focus on the creative part of the project.
You can also combine purchased flowers with a few meaningful blooms from your own garden.
Help Pressed Flowers Keep Their Color

Pressed flowers naturally change with age. Some retain their color beautifully, while others soften into muted, antique shades.
To slow fading:
- begin with fresh, dry flowers
- press them as soon as possible after gathering
- keep the finished work away from moisture
- avoid prolonged direct sunlight
- use acid-free or archival paper when possible
- use only a small amount of adhesive
- protect delicate projects behind glass or beneath a clear surface
Their gradual fading does not necessarily ruin the work. In many projects, the softened colors add to the feeling of an old botanical specimen or keepsake.
Pressed-Flower Projects for the Home
1. Display Flowers in Floating Glass Frames

A floating glass frame is one of the simplest and most beautiful ways to display pressed flowers.
Arrange a single stem for a quiet botanical-study look, or combine several flowers into a small garden scene. Leave open space around the arrangement so the shape of every stem and petal remains visible.
Before closing the frame, experiment with the composition. Turn flowers in different directions, overlap a few petals, or let a stem curve naturally rather than trying to make everything perfectly symmetrical.
A collection of floating frames can be hung near a window where the light can pass through them, although prolonged direct sun may eventually fade the flowers. They also work well on a narrow wall, above a writing desk, or grouped with botanical art and antique mirrors.
2. Create a Small Botanical Gallery Wall

Instead of placing many flowers in one frame, give each bloom or botanical specimen its own space.
Use a group of small frames in similar finishes, or collect vintage and secondhand frames with slightly different shapes. You might organize the display by color, season, plant family, or the place where each flower was found.
A botanical gallery can grow over time. Add one frame each season, after meaningful walks, or whenever something beautiful blooms in your garden.
Small labels beneath the flowers can include the common name, Latin name, gathering date, location, or a few words about why the plant matters to you.
3. Make a Personal Herbarium

An herbarium can be as simple or detailed as you choose.
At its most basic, mount each pressed plant on a page and write its common name beneath it. You may also include the Latin name, where and when it was gathered, and notes about the conditions in which it grew.
A more practical herbarium could record:
- traditional uses
- medicinal properties
- culinary uses
- growing conditions
- bloom time
- scent
- pollinator value
- preservation methods
A more symbolic or personal herbarium could include:
- flower meanings
- folklore and mythology
- cultural associations
- symbolic or spiritual correspondences
- memories attached to the plant
- what the flower represents to you
- a reflection written on the day it was gathered
This turns the herbarium into more than a record of plant identification. It becomes a personal archive of the garden, the seasons, and your evolving relationship with the natural world.
4. Build a Flower-Inspired Mood Board

Use a pressed flower or leaf as the starting point for a home design mood board.
Study its colors, shapes, lines, textures, and growth pattern. Then gather magazine clippings, fabric scraps, paint swatches, printed images, and small material samples that carry the same feeling.
A flower with dusty rose petals and sage-green leaves might inspire muted walls, aged brass, linen curtains, curved furniture, and faded floral textiles. A fern might lead toward deep green, dark wood, botanical prints, branching patterns, and shaded woodland textures.
You could build the board around:
- the flower’s color palette
- the curve or shape of its petals
- its natural habitat
- the season in which it blooms
- the atmosphere it creates
- furniture and decor that echo its structure
- artwork, wallpaper, or textiles inspired by its pattern
This is a beautiful way to use nature as a design teacher rather than treating flowers as decoration alone.
5. Arrange Flowers Into a Collage, Scene, or Symbol

Pressed flowers can become creative materials for building an entirely new image.
Arrange petals, stems, leaves, and seed heads into the shape of:
- a bird
- a butterfly
- a moth
- a rabbit
- a tree
- a moon
- a heart
- a house
- a garden gate
- a meaningful symbol
- a mandala or radial pattern
- an imaginary landscape

A petal may become a wing, a stem may become an antler or tree branch, and a cluster of tiny flowers may form clouds, stars, or a meadow.
This project is especially well suited to leftover pieces that are too small or imperfect for a formal botanical frame. The finished collage can be mounted on paper, placed beneath glass, or photographed and printed as artwork or cards.
6. Turn a Framed Arrangement Into a Decorative Tray

A pressed-flower frame can also become a useful piece of home decor.
Begin with a sturdy frame and arrange pressed flowers beneath the glass. Once the frame is securely assembled, attach a decorative handle to each side.
The result can be used as:
- a perfume tray
- a jewelry tray
- a bedside catchall
- a tea tray for light use
- a candle display
- a place for small bottles and keepsakes
- a decorative layer on a dresser or coffee table

Choose handles that suit the mood of the flowers: antique brass, ceramic, wood, glass, or simple black metal.
Make sure the frame, backing, glass, and handles are secure before lifting or carrying anything on it. For safety, use it mainly for lightweight objects unless the frame has been reinforced.ed.e lifting or carrying anything on it. For safety, use it mainly for lightweight objects unless the frame has been reinforced.
7. Make Pressed-Flower Bookmarks

Bookmarks are an easy project for using small stems and narrow arrangements.
Place pressed flowers between two pieces of thick paper, laminate them, or seal them inside a clear bookmark sleeve. Add ribbon, velvet cord, or a small tassel at the top.
You could create a set organized by:
- seasons
- favorite colors
- garden flowers
- symbolic meanings
- herbs and medicinal plants
- flowers connected with favorite books
They make thoughtful additions to gifts, botanical journals, or books shared with friends.
8. Decorate Handmade Cards, Gift Tags, and Letters

A single pressed flower can make even a simple piece of paper feel meaningful.
Use pressed flowers on:
- birthday cards
- thank-you notes
- wedding cards
- place cards
- gift tags
- seed packets
- handwritten letters
- invitations
- seasonal greetings
- memorial keepsakes
Secure the flower with tiny dots of archival glue or another suitable paper adhesive. Use as little as possible, since delicate petals may become translucent or discolored if saturated.
A flower chosen for its meaning can add another layer to the message. Forget-me-nots may accompany a note of remembrance, while violets, roses, lavender, or daisies can each communicate a different mood.
9. Create a Botanical Journal

A botanical journal combines pressed specimens with writing, sketching, memory, and seasonal observation.
Pages might include:
- the flower’s name
- a pressed specimen
- the date it bloomed
- notes about weather or garden conditions
- a sketch of the living plant
- where it was found
- scent and texture
- a memory from that day
- a poem or quotation
- symbolic associations
- future growing plans
Unlike a formal herbarium, a botanical journal does not need to follow a scientific structure. It can be practical, artistic, reflective, or all three.
Over time, it becomes a portrait of the seasons as you personally experienced them.
10. Frame a Meaningful Bouquet

Flowers from weddings, anniversaries, memorials, births, graduations, and other important events can be preserved as framed artwork.
Because large flowers are difficult to press whole, you may need to separate the bouquet into individual petals, leaves, and smaller blooms. These can then be rearranged into a composition that recalls the original bouquet without trying to reproduce it exactly.
Include a small label with:
- the date
- the occasion
- the location
- names or initials
- a short line from a vow, letter, or reading
The finished piece can hold the memory without requiring the dried bouquet itself to remain intact forever.
11. Make Pressed-Flower Coasters
Pressed flowers can turn small wooden rounds, cork coasters, or repurposed metal lids into useful botanical accents.
Arrange the flowers on the surface, secure them carefully, and apply several thin layers of clear decoupage medium, allowing each layer to dry fully. This is a relatively simple and inexpensive alternative to resin.
Other options include preserving flowers inside resin coasters or placing them beneath clear inserts designed for decorative coasters.
Arrange one larger flower in the center of each coaster or create a scattered pattern using petals and tiny leaves. A coordinated set could feature flowers from one season or several plants gathered from the same garden.
Make sure the flowers are completely dry before sealing them. Follow the product directions for drying and curing, and add felt or cork to the underside if the base could scratch furniture.
12. Decorate a Tray With Flowers Beneath Glass or Resin
A larger tray offers more space for creating a botanical composition.
One beautiful approach is to arrange pressed flowers directly on the tray base in a circular or mandala-like design, then seal them with several thin coats of a clear decoupage medium. This gives the surface a softer, more handmade look than resin and can feel more approachable for simple home projects.
You could arrange:
- flowers radiating from the center
- a mandala or circular pattern
- one sweeping branch
- a loose meadow scene
- specimens in neat rows
- a monogram surrounded by petals
- plants collected from one meaningful place
- flowers from a wedding or gathering
Another option is to place the flowers beneath glass or a clear insert. Resin can also be used, but it requires more preparation and creates a glossier, more permanent finish.
A tray can make pressed-flower art feel less precious and more integrated into daily home life. It becomes something that can be used and noticed rather than stored away.
13. Create Pressed-Flower Ornaments and Sun Catchers

Seal pressed flowers inside clear glass or acrylic ornaments, small hanging frames, or transparent panels.
Hang them:
- in a window
- from a cabinet knob
- on a seasonal branch
- beside a mirror
- from a garden-inspired mobile
- on a Christmas tree
- as part of a wall arrangement
Translucent materials allow the petals and veins to become especially visible when light passes through them.
Use real glass cautiously in areas where children or pets may knock it down. Lightweight acrylic options may be safer for frequently used spaces.
14. Make Framed Initials, Dates, or Words

Arrange pressed petals and small flowers into the shape of a letter, meaningful date, house number, or short word.
Ideas include:
- family initials
- a child’s initial
- a wedding date
- the year a home was built
- the word “home”
- the name of a garden
- a place name
- a short word such as “grow,” “gather,” or “bloom”
This can be especially meaningful when the flowers come from the person, home, garden, or event being represented.
You can plan the composition with fresh flowers or work directly with flowers that have already been pressed. Fresh stems are easier to reposition and can help you test the shape before committing to the final design. Take a photograph of the arrangement, press the individual flowers and leaves, then use the image as a guide when rebuilding it on paper or beneath glass.
When working directly with pressed flowers, lightly sketch the letter or shape first and arrange the most structural stems before adding petals and smaller details. Handle the pieces gently and secure them only after you are satisfied with the composition.
15. Create Botanical Wall Hangings and Window Panels

Larger panes of glass can turn pressed flowers into architectural decor.
Arrange flowers between two clear panels and suspend the finished piece in a window, from a ceiling hook, or against a softly colored wall. Several panels hung at different heights can create the feeling of a floating garden.
For a more private window treatment, combine pressed flowers with translucent handmade paper or frosted material. The result can soften the light without blocking it entirely.
The same idea can be expanded into a folding screen or room divider by arranging botanical specimens within a series of framed panels. Backlighting or placement near a window can make the leaves and stems appear almost translucent, while the grid structure gives the display a more architectural presence.
Keep delicate botanicals away from prolonged harsh sunlight if preserving their original color is important to you.
16. Glass-Front Lockets and Pendants

Place a tiny pressed flower or petal inside a clear locket, miniature frame, or glass-front pendant.
Choose flowers associated with a person, place, season, or memory to make the piece more personal.
Decorative paper can be placed behind the flower to create contrast and give the piece a more intentional background. Consider handmade paper, faded book pages, botanical prints, maps, sheet music, patterned scrapbook paper, or a small piece of writing connected with the memory. Choose a design subtle enough that the flower remains the main focus.
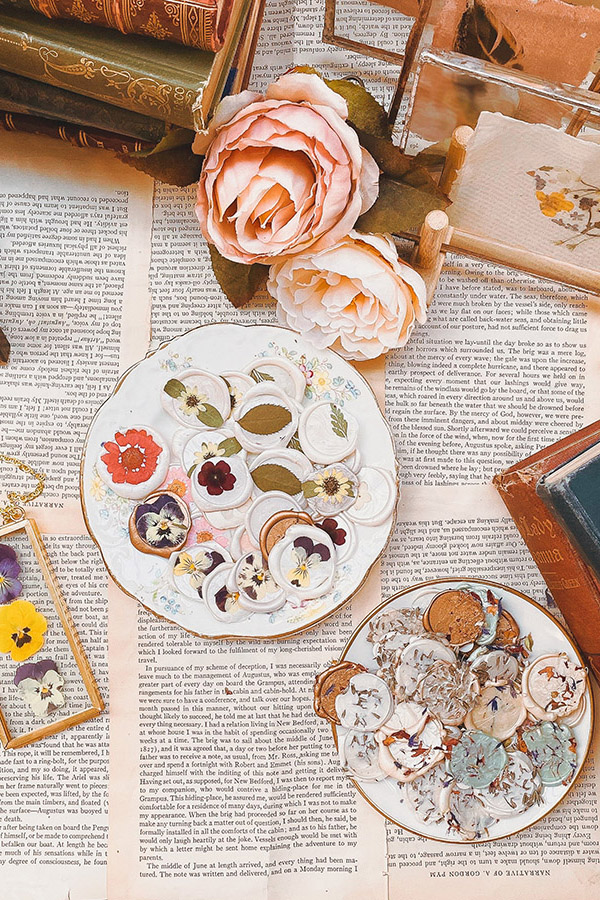
17. Make Pressed-Flower Wax Seals

Pressed flowers can be added to wax seals for letters, invitations, gift wrapping, place cards, keepsake boxes, and other paper projects.
Pour or press the wax as usual, then place a small pressed flower, petal, or leaf onto the surface while the wax is still warm and soft. Press it in gently so the botanical material becomes secure without disappearing completely into the wax.
Small, flat flowers tend to work best. Good options include:
- violas and pansies
- forget-me-nots
- tiny daisies
- individual petals
- small leaves
- delicate herb flowers
- narrow fern pieces
The flower does not necessarily need an additional sealant when the wax seal is being used on an envelope, package, or temporary decorative piece. Some petals may remain slightly exposed, but this can be part of the handmade character.
For a keepsake that will be handled frequently, you may want to protect the flower with a very thin layer of a compatible clear decoupage medium or resin. Test the product on a spare wax seal first, since some coatings may cloud, remain tacky, alter the wax, or change the natural color of the flower.
Wax seals can also be made separately and attached later with adhesive dots. This allows you to create several in advance and use them on letters, journals, framed arrangements, gifts, or decorative displays.
More Pressed-Flower Ideas to Explore
Decorated Lampshades
Attach pressed flowers to the exterior of a plain paper or fabric lampshade using a suitable decoupage method.
Choose cool, low-heat LED bulbs, and never place plant material near the bulb, wiring, or another heat source. The lampshade manufacturer’s guidance should take priority.
Floral Phone Cases
Arrange thin pressed flowers inside a clear phone case, or seal them to the exterior using a compatible clear protective medium.
A removable arrangement beneath a transparent case is the simplest option and allows the flowers to be changed seasonally.
Pressed-Flower Soap
Small dried and pressed botanicals can decorate the surface of handmade soap or be embedded in melt-and-pour soap.
Flowers may change color when exposed to moisture or heat, and some plant material can feel scratchy against the skin. Use only skin-safe botanicals and a tested soap-making method.
Flowers Preserved in Handmade Paper
Pressed flowers and petals can be incorporated into handmade paper, stationery, cards, lampshades, wrapping, or framed pieces.
Some flowers may be added to the paper pulp, while others can be placed on the wet surface so their shape remains more visible.
Pressed-Flower Cabinet or Drawer Liners
Arrange flowers on decorative paper, scan or photograph the design, and print it as custom drawer liner.
This preserves the original flowers while allowing the pattern to be repeated. It is often more practical than placing fragile flowers directly inside a drawer.
Floral Decoupage on Boxes
Decorate wooden, papier-mâché, or sturdy cardboard boxes with pressed flowers and a clear decoupage medium.
Use them for:
- letters
- jewelry
- seeds
- photographs
- garden labels
- ribbons
- small keepsakes
A dark background creates a dramatic botanical look, while pale wood or softly colored paint feels lighter and more romantic.
Botanical Cabinet Panels
Pressed flowers can be displayed behind glass-front cabinet doors or inside removable clear panels placed at the back of shelves.
This creates a botanical backdrop without permanently altering the furniture.
Pressed-Flower Candles
Pressed flowers can be attached decoratively to the outside surface of a pillar candle with melted wax, but dried botanicals are flammable.
For safety, the flowers should remain well away from the wick and flame. A safer decorative option is to place the botanical candle inside a larger lantern or use a flameless candle.
Botanical Candle Holders and Lanterns
Instead of applying flowers directly to a candle, seal pressed flowers onto the outside of a glass jar or translucent paper lantern.
Use battery-operated lights for the safest glowing effect.
Let the Project Carry a Memory

Pressed-flower projects do not need perfect blooms or complicated materials to feel valuable.
A slightly faded flower gathered from your own garden may mean more than a flawless specimen purchased for a craft. A bent stem can preserve the shape in which it grew. A small petal can recall a bouquet, a walk, a gathering, or a season that mattered.
The project may become part of the home, but its deepest value often lies in what it helps us notice and remember.
Press a flower because it is beautiful. Press another because you want to remember where you found it. Record its name, build a design around its colors, turn it into a useful object, or allow it to remain simply what it is: one small piece of a living season, carefully kept.
Flower crafts can also become a shared seasonal activity, as in a creative botanical garden gathering in early summer or a high-summer garden gathering where guests press flowers, make herb bundles, sketch, or create arrangements together.